Avoid too much sorting

“Java is slow” is the sentence that I heard very often when I began studying computer science – and I forunately never really believed it. But why the predjudice? Well Java CAN be slow if it’s just handeled wrong. Often it’s just convenience of just the missing knowledge of implemntations that makes code slow, so I’ll try to post once in a while whenever I come across such code parts in my hobby programming or at my programmings at work.

So my first issue is about sorting and autoboxing: About last week we profiled some code that felt just sloooow. It turned out that we lost most of the time within a certain loop that was executed very often. The critical part of the code was (stripped from all other stuff) like this :

ArrayList<Double> list = new ArrayList<Double>(20); // keep 20 smallest calculated values
while (condition) {
  double value = calculate(args);
  if (list.size < 20 || value < list.get(19)){
    list.add(value);
    Collections.sort(list)
  }
  // strip elements if size is > 20
}

So what’s the issue here?

  1. condition holds true for a LOT of iterations (well, can’t change this)
  2. the list is small (just 20) BUT it is to be sorted completely for each insert
  3. could autoboxing be an issue here?

Okay, what did we change?

We changed the ArrayList to a SortedDoubleArray (an implementation that I coded some time ago) that inserts the value already in the correct place using Arrays#binaraySearch() and System.arrayCopy(). As I wasn’t quite sure whether or not autoboxing could be an issue here, I created a copy of the class that operates on Doubles instead of the double primitives.

The Test

In order to compare the 3 methods (using Collections.sort(), and the SortedArrays using double and Double), I inserted 1,000,000 random double values into the structures and measured the times. The results are:

  • Collection.sort(): 2907 ms (=100%)
  • SortedDoubleArray (with Double-autoboxed values):  93 ms (~3%)
  • SortedDoubleArray (with double primitives):  94 ms (~3%)

Conclusion

  • Using Collections.sort() is convenient and in most cases absolutely okay! But if you use it in critical locations within the code (for example in loops that are executed very often), you might want to check if there isn’t a better solution.
  • Autoboxing does not hurt in our case

But never forget: Profile first, then tune. Otherwise you might tune code that has almost no impact to the overall execution time (for example, if the for-loop above is just executed 10 times).  And just change one issue after the other and perform measurements between each step so that you can identify the changes with the most impact.
If you have no profiler at hand, you might want to try the NetBeans profier.

value

How to load images in Java

Every once in a while there is a question on the NetBeans mailinglist about how to load an image (or other ressource, like a text file) relative to the executing JAR.

The Java Tutorial gives the answer in the chapter “How to use Icons“:

java.net.URL imgURL = getClass().getResource("inSamePackage.png");
java.net.URL imgURL = getClass().getResource("/de/foo/otherPackage.png");

Continue reading How to load images in Java

How to pack multiple JARs into one using ANT (and NetBeans)

Eines der Features, die ich bei NetBeans eine ganze Zeit lang nicht realisiert hatte war die Tatsache, dass NetBeans beim Compilieren automatisch ein ausführbares JAR erstellt, und JAR nebst Libraries in das “dist”-Verzeichnis im Projektordner kopiert. Das heißt das sieht dann so aus:

Coole Sache eigentlich. Nur – um die Applikation einfach so online zu stellen oder jemandem aufs Auge zu drücken (oder in den Java Store hochzuladen), wäre es doch fein, wenn man nur noch ein einziges JAR hätte und nicht noch zusätzlich die ganzen Libs aus “/dist/libs/” mitschicken muss (und das können schon einige sein – in meinem Mini-Projekt zB schon 19).

Viele Leute ziehen ein Jar zB einfach auf den Desktop um es direkt dort per Doppelklick zu starten. Das geht in dem Fall nicht mehr, da ja der libs-Ordner auch auf dem Desktop liegen müsste. Klar, eine Möglichkeit wäre, die Applikation woanders hin kopieren und eine Verknüpfung auf den Desktop legen – aber wir wollen dem User ja entgegenkommen.

Also:  ein einziges JAR muss her. Im Sun Developer Network (SDN) findet sich dazu auch die passende Anleitung im Artikel: “Use NetBeans IDE 6.7 to Combine JAR Files Into a Single JAR File“. Dort wird schön erklärt, wie man die build.xml ändern muss um genau das zu erreichen.

In diesem Sinne: Viel Erfolg beim ausprobieren.

improved ButtonUI

In the JavaGraphics Blog there are some very nice examples of how Java Buttons can be made nicely. The code is also available. So it’ a nice starting point for learning how to make own UIs! Features include:

  • cross-platform.
  • pure Java
  • Resizable
  • Vertical segments
  • Java 1.4 compatible

See the BlogPost here.

Java Library for reading & writing EXIF, XMP and IPTC in JPEGs

Finally it seems that I’ve found a pure Java Library that can read and write XMP Data to and from JPEGs!

In the past time I’ve been googling for such a library repeatedly. There are quite some libraries for just reading EXIF or IPTC data. Amongst others are Drew Noakes’ library and Imagero. As I am on the verge of adding more metadata functionality to my self-made image database I had 2 issues:

  1. A decision of how to store labels and descriptions to images: a database only without touching the images or IPTC, XMP within images (with cached information to a database). Finally I decided that I wanted to use XMP(or IPTC so that the information is kept close to the image.
  2. A library for this!

What I’ve found so far (incomplete listing as I came across QUITE some libs for reading data):

Imagero and Drew Noakes: Until now I was using Drew Noakes library for reding EXIF data – which was absolutely okay but couldn’t write any data 🙁 Imagero supports writing of IPTC and XMP (from what I’ve read) and is even free for non-commercial usage. But it’s not true open source and you need to request a licence every year (which works w/out problems!). Judging the work Andrey Kusnetsov (maintainer of Imagero) is putting into it I think, that’s quite acceptable.

Adobe XMP SDK: Adobe – as the inventor of XMP – has released an SDK for reading/writing XMP. Most of the SDK is written in C, the SDK Core is also available in Java (great!) but the functionality to get and write the XMP to and from files .. is not available as Java. Quite annoying.

Apache Sanselan: When searching for Apache Sanselan you most likely end up at the incubator-site which says that the project is in the stat of migrating into apache – the mailinglist also doesn’t work. The simple reason: Sanselan is already a part of Apache Commons. So, this new link is the place to go. The most interesting thing of Sanselan is the format support:

  • JPEG IPTC support: read (yes), write (soon), Can read IPTC data from exsiting JPEG/JFIF files WITHOUT modifying image data.
  • JPEG EXIF: read (yes), write (yes), Can read and write EXIF data to and from exsiting JPEG/JFIF files WITHOUT modifying image data.
  • XMP: read (yes), write (yes), Can read XMP XML (as as String) from […] JPEG […]. Can remove, insert and update XMP XML into existing JPEG files.

Update: the downside of Sanselan is that development seems to have stalled. The current release is 0.97 from February 14th, 2009. :-(((

How to display images with rounded Corners / Borders

Bilder in Java darzustellen ist keine große Kunst, dazu gibt es auch ein Tutorial von Sun. Etwas schöner wären aber abgerundete Ecken. Und noch schöner wäre es, wenn wir einfach eine kleine Componente hätten die das alles selber macht, die wiederverwendbar wäre und die im GUI-Editor einfach zu bedienen wäre. Gesagt getan.

Die Anforderung ist also eine Gui Componente, die im Gui Editor (NetBeans in meinem Falle) wiederverwendbar ist (also ein JavaBean), der man ein Bild übergeben kann und bei der die Ecken abgerundet sind. Wenn möglich, wollen wir sogar noch einen Rahmen setzen können. Ein kurzer Blick auf die Seite “Painting in AWT and Swing” zeigt, dass wir paintComponent() überschreiben sollten. Die Componente soll sich der Einfachheit halber der Größe des Bildes automatisch anpassen.

Die fertige Klasse sieht dann so aus:

public class ThumbPanel extends JPanel {

    protected BufferedImage image = null;
    public static final String PROP_IMAGE = "image";
    protected int roundness = 10;
    public static final String PROP_ROUNDNESS = "roundness";

    public ThumbPanel() {
        init();
    }

    private void init() {
        setOpaque(false);
    }

    protected void update() {
        if (image != null) {
            setSize(image.getWidth(), image.getHeight());
            setPreferredSize(new Dimension(image.getWidth(), image.getHeight()));
        }
    }

    @Override
    protected void paintComponent(Graphics g) {
        if (image == null) {
            return;
        }
        g.setClip(new RoundRectangle2D.Double(0, 0, image.getWidth(), image.getHeight(), roundness, roundness));
        g.drawImage(image, 0, 0, null);
        g.setClip(null);
    }

    public int getRoundness() {
        return roundness;
    }

    public void setRoundness(int roundness) {
        int oldRoundness = this.roundness;
        this.roundness = roundness;
        firePropertyChange(PROP_ROUNDNESS, oldRoundness, roundness);
        update();
    }

    public BufferedImage getImage() {
        return image;
    }

    public void setImage(BufferedImage image) {
        BufferedImage oldImage = this.image;
        this.image = image;
        firePropertyChange(PROP_IMAGE, oldImage, image);
        update();
    }
}

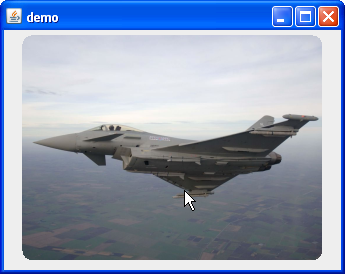
Getter und Setter sind selbsterklärend. Update() passt die Komponente der aktuellen Größe an. Ein Null-Images possiert in meinem Anwendungsfall nicht, wäre aber offenbar kein Problem das anzupassen. PaintComponent() setzt die Clip-Eigenschaft und malt dann das Bild auf die Komponente – fertig! Das ganze sieht dann so aus:

rounded corners ISo weit so gut. Nun will man aber vielleicht noch einen Rahmen (=Border) dazufügen. Standard Borders sehen dabei nicht ganz so praktikabel aus, da sie an den Ecken abgeschnitten werden. Also muss wohl oder übel eine eigene Border her. Schön wäre ein Rahmen, bei dem man Farbe, Dicke und Rundung einstellen kann. Der Versuch, die LineBorder zu extenden war nicht wirklich von Erfolg gekrönt, da man dabei Dicke und Rundung nicht separat einstellen kann.

Also selber malen. Linien mit RoundRectangle2Ds zu zeichnen, wollte nie so wirklich schön werden. Insbesondere sobald die Dicke > 1 Pixel sein sollte. Alternative: Roundrect fill und innen wieder Clip’en.  Nur dumm, dass sich das Clip dann auch auf das Bild übertragen hatte. Also per AlphaComposite das Innere einfach ausschneiden. Damit auch bei mehrfachen repaints, nicht immer ein BufferedImage für den Rahmen erzeugt werden muss, wird das Ergebnis einfach gecached. Die ganze klasse sieht dann so aus:

public class MyRoundBorder implements Border {

    private PropertyChangeSupport propertyChangeSupport = new PropertyChangeSupport(this);
    protected int roundness = 10;
    public static final String PROP_ROUNDNESS = "roundness";
    protected Color color = Color.BLACK;
    public static final String PROP_COLOR = "color";
    protected int thickness = 1;
    public static final String PROP_THICKNESS = "thickness";
    // buffer the created image because recreating a complete image could waste precious time
    protected SoftReference cache = new SoftReference(null);
    protected Rectangle oldR = new Rectangle();
    protected Rectangle oldC = new Rectangle();

    public MyRoundBorder() {
    }

    public MyRoundBorder(int roundness, Color color, int thickness) {
        this.roundness = roundness;
        this.color = color;
        this.thickness = thickness;
    }

    public int getThickness() {
        return thickness;
    }

    public void setThickness(int thickness) {
        int oldThickness = this.thickness;
        this.thickness = thickness;
        propertyChangeSupport.firePropertyChange(PROP_THICKNESS, oldThickness, thickness);
        cache = new SoftReference(null);
    }

    public Color getColor() {
        return color;
    }

    public void setColor(Color color) {
        Color oldColor = this.color;
        this.color = color;
        propertyChangeSupport.firePropertyChange(PROP_COLOR, oldColor, color);
        cache = new SoftReference(null);
    }

    public int getRoundness() {
        return roundness;
    }

    public void setRoundness(int roundness) {
        int oldRoundness = this.roundness;
        this.roundness = roundness;
        propertyChangeSupport.firePropertyChange(PROP_ROUNDNESS, oldRoundness, roundness);
        cache = new SoftReference(null);
    }

    public void addPropertyChangeListener(PropertyChangeListener listener) {
        propertyChangeSupport.addPropertyChangeListener(listener);
    }

    public void removePropertyChangeListener(PropertyChangeListener listener) {
        propertyChangeSupport.removePropertyChangeListener(listener);
    }

    @Override
    public void paintBorder(Component c, Graphics g1, int x, int y, int width, int height) {
        Graphics2D g = (Graphics2D) g1;

        BufferedImage buffered = cache.get();
        Rectangle newR = new Rectangle(x, y, width, height);
        if (buffered == null || !c.getBounds().equals(oldC) || !oldR.equals(newR)) {
            buffered = new BufferedImage(c.getWidth(), c.getHeight(), BufferedImage.TYPE_INT_ARGB);
            Graphics2D tmpg = buffered.createGraphics();
            tmpg.setRenderingHint(RenderingHints.KEY_ANTIALIASING, RenderingHints.VALUE_ANTIALIAS_ON);
            tmpg.setClip(g1.getClip());
            tmpg.setColor(color);
            // fill area
            tmpg.fillRoundRect(x, y, width, height, roundness, roundness);
            // cut out inner
            tmpg.setComposite(AlphaComposite.getInstance(AlphaComposite.DST_OUT));
            tmpg.fillRoundRect(x + thickness, y + thickness, width - (2 * thickness), height - (2 * thickness), roundness, roundness);
            tmpg.dispose();

            cache = new SoftReference(buffered);
            c.getBounds(oldC);
            oldR = newR;
        }
        // draw border upon image
        g.drawImage(buffered, 0, 0, null);
    }

    @Override
    public Insets getBorderInsets(Component c) {
        return new Insets(thickness, thickness, thickness, thickness);
    }

    @Override
    public boolean isBorderOpaque() {
        return true;
    }
}

Die Getter/Setter sind wieder dazu da, eine schöne JavaBean zu bauen, damit die Border auch im GUI Editor einfach zu verwenden ist.

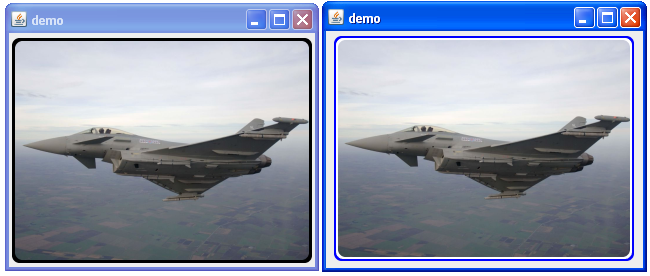
Da normale Borders verwendet werden können, kann natürlich auch eine CompoundBorder verwendet werden – um zum Beispiel anzuzeigen, wenn ein Bild selektiert ist (dann zB mit zusätzlichem weißen Innenrahmen), was dann so aussieht (links einfach, rechts Compond):

CompoundBorder II

Erste Schritte mit JavaX JXMapKit

Update 2014: Mittlerweile kann es durchaus schlauer sein JavaFX zu verwenden, so wie es hier beschrieben ist.


Nachdem ich festgestellt habe, dass Nasa WorldWind zum Anzeigen von Kartenpositionen vielleicht doch ein bisschen Overkill ist, habe ich mir JXMapKit des SwingLabs-Projekts angesehen.

Um das Beispiel überhaupt zum Laufen zu bekommen, benötigen wir natürlich die richtigen Libraries. Das wären dann SwingX und SwingX-ws. Derzeit wird man mit der Kombination nicht ganz glücklich, da in SwingX 1.0 (mindestens) eine Methode entfernt wurde, die in SwingX-ws benötigt wird. Der zugehörige Bug ist zwar reported, aber natürlich noch nicht in der aktuellsten Version eingebaut (Stand 30.7.2009). Eine gepatchte Version habe ich hier online gestellt: Jar / Quellen.

Wenn die Libraries erst einmal im Classpath liegen ist es im Prinzip ganz einfach (ich erkläre wie immer anhand von NetBeans aufgrund des besseren GUI-Editors):

  1. JFrame-Form erstellen
  2. JXMapKit in den Frame ziehen
  3. die JXMapKit Komponente anklicken und in den Properties den defaultProvider auf OpenStreetMap stellen, andernfalls bekommt man nur Exceptions.
  4. fertig!

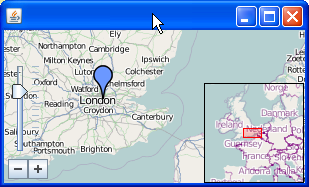
Das ganze sollte dann so aussehen:

Screenshot von JXMapKit

Der Code dazu sieht folgendermaßen aus:

public class MapViewer extends javax.swing.JFrame {
    public MapViewer() {
        initComponents();
    }

    private void initComponents() {
        jXMapKit1 = new org.jdesktop.swingx.JXMapKit();
        setDefaultCloseOperation(javax.swing.WindowConstants.EXIT_ON_CLOSE);
        jXMapKit1.setDefaultProvider(org.jdesktop.swingx.JXMapKit.DefaultProviders.OpenStreetMaps);
        getContentPane().add(jXMapKit1, java.awt.BorderLayout.CENTER);
        pack();
    }

    public static void main(String args[]) {
        java.awt.EventQueue.invokeLater(new Runnable() {
            public void run() {
                new MapViewer().setVisible(true);
            }
        });
    }
    private org.jdesktop.swingx.JXMapKit jXMapKit1;
}

OpenStreetMap ist ja ganz schön. Aber eine Karte wäre ja auch fein. Das erreicht man, indem eine neue TileFactory erstellt wird. Dazu wird schnell der Konstruktor geändert:

    public MapViewer() {
        initComponents();
        WMSService wms = new WMSService();
        wms.setLayer("BMNG");
        wms.setBaseUrl("http://wms.jpl.nasa.gov/wms.cgi?");
        TileFactory fact = new WMSTileFactory(wms);
        jXMapKit1.setTileFactory(fact);
    }
Screenshot von JXMapKit mit BlueMarble
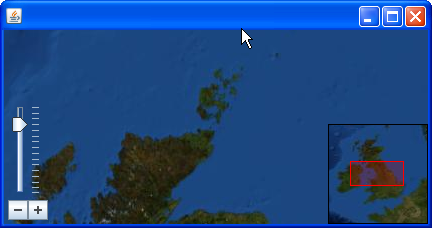
Screenshot von JXMapKit mit BlueMarble der NASA

Und schon sieht’s so aus:

Beim Starten kann es sein, dass man erst mal nur ein blaues Fenster sieht. Ändert sich leicht, indem man ein paar mal auf den Minus-Button drückt und etwas abwartet, da das Laden der Bilder vom Nasa-Server etwas dauern kann. Bei genauem Hinsehen, wird man im obigen Screenshot auch bemerken, dass der markierte Ausschnitt im rechten unteren Teil nicht mit der tatsächlichen Darstellung übereinstimmt sondern (in dem Fall) einen Ausschnitt anzeigt, der deutlich südlicher liegt (im Fenster sieht man nämlich eigentlich die Nordspitze Schottlands.

Nützliche Links:

erste Schritte mit Nasa World Wind

Photos auf einer Karte anzuzeigen kann so schwer nicht sein möchte man meinen. Anbindung an Google Maps oder Google Earth und gut is.

Will man diese Kartenanzeige jetzt noch in ein Java-Programm integrieren, sieht’s schon anders aus. Google Maps wäre kein Problem, wenn denn JWebPane schon fertig wäre. Ist es aber nicht. Also bleiben derzeit nur noch 2 Methoden: Nasa WorldWind einbinden oder JXMapViewer benutzen.

Der erste Test mit Nasa WorldWind ging erheblich schneller als erwartet: Das NetBeansWiki beschreibt die wenigen nötigen Schritte.

  1. Nasa Worldwind Java SDK herunterladen
  2. In Netbeans eine Library mit den Dateien worldwind.jar, jogl.jar und gluegen-rt.jar anlegen
  3. die Library zum Projekt hinzufügen
  4. Ein JFrame-Form erstellen
  5. (optional einige JavaBeans in die Palette des GUI Managers hinzufügen)
  6. WorldWindowGLCanvas in den JFrame ziehen
  7. folgende Imports hinzufügen:
    import gov.nasa.worldwind.*;
    import gov.nasa.worldwind.avlist.AVKey;
  8. und folgenden Code unter den initComponents() Aufruf des Konstruktors:
    Model m = (Model) WorldWind.createConfigurationComponent(AVKey.MODEL_CLASS_NAME);
    worldWindowGLCanvas1.setModel(m);
  9. In den Projekteigenschaften noch folgende JVM-Property setzen: -Djava.library.path=c:pfadzumnasaworldwindsdk
  10. fertig!

Die ganze Klasse sieht dann so aus:

import gov.nasa.worldwind.*;
import gov.nasa.worldwind.avlist.AVKey;

public class NWW extends javax.swing.JFrame {

    public NWW() {
        initComponents();
        Model m = (Model) WorldWind.createConfigurationComponent(AVKey.MODEL_CLASS_NAME);
        worldWindowGLCanvas1.setModel(m);
    }

    private void initComponents() {
        worldWindowGLCanvas1 = new gov.nasa.worldwind.awt.WorldWindowGLCanvas();
        setDefaultCloseOperation(javax.swing.WindowConstants.EXIT_ON_CLOSE);
        setTitle("Nasa World WInd");
        setMinimumSize(new java.awt.Dimension(640, 480));
        getContentPane().add(worldWindowGLCanvas1, java.awt.BorderLayout.CENTER);
        pack();
    }

    public static void main(String args[]) {
        java.awt.EventQueue.invokeLater(new Runnable() {
            public void run() {
                new NWW().setVisible(true);
            }
        });
    }
    private gov.nasa.worldwind.awt.WorldWindowGLCanvas worldWindowGLCanvas1;
}

Nützliche Links:

Embedding Swing in JavaFX vs. embedding JavaFX in Swing

“Insider’s Guide to Mixing Swing and JavaFX” lautet der Titel vom Amy Fowlers Blogeintrag. Ich habe mich schon gefreut, dass es mit JavaFX 1.2 endlich möglich ist, JavaFX in Swing einzubetten um so die neuen features in bestehenden Swingapplikationen nutzen zu können, ohne das ganze über den (in)offiziellen Hack  laufen zu lassen, der im JavaFX Blog unter “How to Use JavaFX in Your Swing Application” beschrieben ist.

Aber: “If you’re a Swing developer […], I’ve broken down the process into 10 steps for integrating your Swing components into a JavaFX application.”
Genau die andere Richtung wäre für die meisten Swing-Entwickler mit bestehenden Applikationen die interessantere!

Aber 2: “Note: We also recognize the need for the inverse (embedding a JavaFX scene into a Swing app), however that is not supported with 1.2 as it requires a more formal mechanism for manipulating JavaFX objects from Java code.

Also abwarten und hoffen, Hack benutzen, oder derweil einfach sein lassen.

Bilder in Java schnell skalieren / Fast Image Scaling / Resizing in Java

I’m recognizing, that this article faced quite some hits – if you’re a non-german user and want this article to be translated, please leave me a comment – maybe I’m gonna translate it if that is what people want.
Bilder in Java skalieren ist ein Thema für sich…

Intro

Verführerisch ist sie ja, die Image.getScaledImage()-Methode. Und ebenso fatal, denn sie ist eine heißer Kandidat den Code elends langsam zu machen. Wie geht’s schneller/besser? Ein wertvoller Link zum Einstieg ist The Perils of Image.getScaledInstance() und die dortigen Links.

Die obige Aussage (bzgl. langsam) ist ohne Zahlen quasi wertfrei. Gerade eben habe ich wieder ein Stück Code vor mir, indem Bilder skaliert werden müssen – und das schnell, da der Benutzer wartet! Ich habe also über den Daumen nicht mehr als 100-200ms Zeit, dem Benutzer  ein Ergebnis zu präsentieren, bevor die Anwendung langsam wirkt. Also:  meinen eigenen ImageScaler verwenden, den ich vor Zeiten mal geschrieben habe oder auf JAI (Java Advanced Imaging) zurückgreifen?
Der Plan ist klar: eine Performance-Messung muss her (da ich noch weiß, dass ich damals nicht mit JAI verglichen habe).

Messung / Ergebnisse

Input: Ein Jpeg 4008 x 2443 Pixel / 2,47 MB
Output: Das Bild soll in max. 400 x 400 Pixel eingebettet werden, Seitenverhältnis soll beibehalten werden (also ~400 x 243 Pixel).
Kandidaten:

  1. Image.getScaledInstance()
  2. mein eigener Scaler
  3. JAI

Setup: Bild ausserhalb der Zeitmessung einlesen, jeweils 20x skalieren und die benötigte Zeit ausgeben. JAI wird dabei mit nativen DLLs getestet ().

Ergebnis 1:

  1. Image.getScaledInstance(): ~30 ms
  2. mein eigener Scaler: ~234 ms
  3. JAI: ~500 ms

Moment – das ist NICHT was erwartet war.
Image img = src.getScaledInstance(400, -1, Image.SCALE_FAST);
Sieht aus als könnte man nicht viel falsch machen. – Aber wird da überhaupt etwas gemacht?
Verändern wir den Aufruf:
img.getSource().startProduction(new ImageConsumer() { … leere Methodenrümpfe… }

Ergebnis 2:

  1. Image.getScaledInstance(): 35781 ms
  2. mein Scaler:  ~234 ms
  3. JAI: ~500 ms

Aha. So sieht das aus wie erwartet. getScaledInstance() skaliert das Bild also erst bei Bedarf – leider sehr langsam.

Ergebnis 3 – 1x, 5x und 50x kleinskalieren:

  1. mein Scaler:  ~ 60 ms, ~ 90 ms, ~460 ms
  2. JAI: ~500 ms, 500 ms, 500 ms

Ahja – JAI cached offenbar. Interessant zu wissen – bei entsprechendem Szenario also sicher die bessere Wahl – diesmal gewinnt aber mein Scaler, da hier nur kleinskaliert werden soll und die restlichen JAI-Features eh ungenutzt bleiben.

Fazit

Das Key Feature meines Skalers ist die Essenz aus vielen Blogs und JavaOne-Folien:

  1. Solange das Bild größer als die doppelte Zielgröße ist: Bild mit Faktor 0.5 und Nearest Neighbor Interpolation skalieren. – Um nicht duzende Zwischenbilder erzeugen zu müssen (was bei großen Eingangsbildern richtig viel Speicher kosten kann, da die Bilder ja im Speicher dekomprimiert werden müssen!), skaliere ich in einem Schritt auf das kleinste Bild, das noch größer als das Zielbild ist.
  2. letzten Skalierungsschritt mit Bilinearer Interpolation skalieren.

Code:

public class ImageScaler {

    public BufferedImage scaleImage(BufferedImage img, Dimension d) {
        img = scaleByHalf(img, d);
        img = scaleExact(img, d);
        return img;
    }

    private BufferedImage scaleByHalf(BufferedImage img, Dimension d) {
        int w = img.getWidth();
        int h = img.getHeight();
        float factor = getBinFactor(w, h, d);

        // make new size
        w *= factor;
        h *= factor;
        BufferedImage scaled = new BufferedImage(w, h,
                BufferedImage.TYPE_INT_RGB);
        Graphics2D g = scaled.createGraphics();
        g.setRenderingHint(RenderingHints.KEY_INTERPOLATION,
                RenderingHints.VALUE_INTERPOLATION_NEAREST_NEIGHBOR);
        g.drawImage(img, 0, 0, w, h, null);
        g.dispose();
        return scaled;
    }

    private BufferedImage scaleExact(BufferedImage img, Dimension d) {
        float factor = getFactor(img.getWidth(), img.getHeight(), d);

        // create the image
        int w = (int) (img.getWidth() * factor);
        int h = (int) (img.getHeight() * factor);
        BufferedImage scaled = new BufferedImage(w, h,
                BufferedImage.TYPE_INT_RGB);

        Graphics2D g = scaled.createGraphics();
        g.setRenderingHint(RenderingHints.KEY_INTERPOLATION,
                RenderingHints.VALUE_INTERPOLATION_BILINEAR);
        g.drawImage(img, 0, 0, w, h, null);
        g.dispose();
        return scaled;
    }

    float getBinFactor(int width, int height, Dimension dim) {
        float factor = 1;
        float target = getFactor(width, height, dim);
        if (target <= 1) { while (factor / 2 > target) { factor /= 2; }
        } else { while (factor * 2 < target) { factor *= 2; }         }
        return factor;
    }

    float getFactor(int width, int height, Dimension dim) {
        float sx = dim.width / (float) width;
        float sy = dim.height / (float) height;
        return Math.min(sx, sy);
    }
}

Nützliche Links:
public class ImageScaler {public BufferedImage scaleImage(BufferedImage img, Dimension d) {
img = scaleByHalf(img, d);
img = scaleExact(img, d);
return img;
}

private BufferedImage scaleByHalf(BufferedImage img, Dimension d) {
int w = img.getWidth();
int h = img.getHeight();
float factor = getBinFactor(w, h, d);

// make new size
w *= factor;
h *= factor;
BufferedImage scaled = new BufferedImage(w, h,
BufferedImage.TYPE_INT_RGB);
Graphics2D g = scaled.createGraphics();
g.setRenderingHint(RenderingHints.KEY_INTERPOLATION,
RenderingHints.VALUE_INTERPOLATION_NEAREST_NEIGHBOR);
g.drawImage(img, 0, 0, w, h, null);
g.dispose();
return scaled;
}

private BufferedImage scaleExact(BufferedImage img, Dimension d) {
float factor = getFactor(img.getWidth(), img.getHeight(), d);

// create the image
int w = (int) (img.getWidth() * factor);
int h = (int) (img.getHeight() * factor);
BufferedImage scaled = new BufferedImage(w, h,
BufferedImage.TYPE_INT_RGB);

Graphics2D g = scaled.createGraphics();
g.setRenderingHint(RenderingHints.KEY_INTERPOLATION,
RenderingHints.VALUE_INTERPOLATION_BILINEAR);
g.drawImage(img, 0, 0, w, h, null);
g.dispose();
return scaled;
}

float getBinFactor(int width, int height, Dimension dim) {
float factor = 1;
float target = getFactor(width, height, dim);
if (target <= 1) { while (factor / 2 > target) { factor /= 2; }
} else { while (factor * 2 < target) { factor *= 2; }         }
return factor;
}

float getFactor(int width, int height, Dimension dim) {
float sx = dim.width / (float) width;
float sy = dim.height / (float) height;
return Math.min(sx, sy);
}
}